Friday, October 15, 2010

JSP Session Management-I


JSP Session Management in jsp


Introduction:
                        The HTTP (Hypertext Transfer Protocol) was designed for transferring files over the World Wide Web (WWW). HTTP uses simple communication model. A client who uses browser to send request for some files, the server responds the request. For example, the client request username and the server send response the username to client. After completing the response, the communication connection is complete. And then the client request another resource, the server has no way of distinguishing it from any other client. So HTTP is called Stateless protocol.
                       
Session Tracking:

1). Hidden Form Fields.

2). URL rewriting

3). Cookies

4). HTTP session API

Example:

Letus go for understanding the use of session.

Consider three files A.jsp and B.jsp and Result.jsp

A.jsp file have one textbox to get FirstName as input and OK button.

Screen Shot below

 
B.jsp file have one textbox to get Lastname as input and OK button.

Screen Shot below


In Result.jsp, we get firstname from A.jsp and lastname from B.jsp and also display the firstname and lastname in Result.jsp..


Procedure:

Step1:

Create Project SessionPro.(Already we have seen how to create Project for web application.

Step 2:

Create Folder ,folder name is jsp to save jsp file

            Jsp---- for jsp files


Step 3:

            Creating A.jsp

Already I have explained how to create jsp file. So you follow that ways to create jsp file.

Include following coding into the A.jsp

< %@page contentType="text/html" pageEncoding="UTF-8"% >
< !DOCTYPE HTML PUBLIC "-//W3C//DTD HTML 4.01 Transitional//EN"
http://www.w3.org/TR/html4/loose.dtd >

< html >
< head >
< meta http-equiv="Content-Type" content="text/html; charset=UTF-8" >
< title > A JSP Page < /title >
< /head &g
< body gt
< h1 > A JSP Page < /h1 >
< form method="post" action="http://localhost:8084/SessionPro/Jsp/B.jsp" >
FirstName < input type="text" name="Fname"/ >
< input type="submit" value="OK"/ >
< /form >
< /body >
< /html >


Step 4:
            Creating B.jsp

< %@page contentType="text/html" pageEncoding="UTF-8"% >
< !DOCTYPE HTML PUBLIC "-//W3C//DTD HTML 4.01 Transitional//EN"
http://www.w3.org/TR/html4/loose.dtd >

< html >
< head >
< title > B JSP Page < /title >
< /head &g
< body gt
< h1 > B JSP Page < /h1 >
< form method="post" action="http://localhost:8084/SessionPro/Jsp/Result.jsp" >
LastName < input type="text" name="Lname"/ >
< input type="submit" value="OK"/ >
< /form >
< /body >
< /html >


step 5:

            Creating Result.jsp

< %@page contentType="text/html" pageEncoding="UTF-8"% >
< !DOCTYPE HTML PUBLIC "-//W3C//DTD HTML 4.01 Transitional//EN"
http://www.w3.org/TR/html4/loose.dtd >

< html >
< head >
< title > Result JSP Page < /title >
< /head >
< body >
< %
String firstname=request.getParameter("Fname");
String secondname=request.getParameter("Lname");
out.println(“Firstname ”+firstname);
out.println(“ < br >”);
out.println(“Lastname ”+secondname);
% >
< /body >
< /html >


Step 6:
                  Run the A.jsp


You give Firstname as your desired.

I will give Firstname as suresh

OK

The control go to B.jsp Because we specify the path in action.


In B.jsp I give Kumar as Lastname. And Click OK.

The control goes to Result.jsp.

In Result.jsp,we use predefined objct request and their method getParameter().

Request.getParameter() – used to get Form Field value from one page to another page.


Explain:

            We can see null and Kumar.

            Lastname will be displayed only. Firstname is null.

Why?

We did not use any session management. Because

HTTP is a stateless Protocol. Only It maintains states between two page.

We want to maintain state many pages, we use session tracking.

 There are four type of session tracking.

1). Hidden Form Field

2). URL Rewriting

3). Cookies

4). HTTP Session API

Next post we will use Hidden Form Field to maintain states.


NOTE: We have not used any session management so far. Consider above example without session management.

Thursday, October 14, 2010

JSP Session Management-I


JSP Session Management in jsp


Introduction:
                        The HTTP (Hypertext Transfer Protocol) was designed for transferring files over the World Wide Web (WWW). HTTP uses simple communication model. A client who uses browser to send request for some files, the server responds the request. For example, the client request username and the server send response the username to client. After completing the response, the communication connection is complete. And then the client request another resource, the server has no way of distinguishing it from any other client. So HTTP is called Stateless protocol.
                       
Session Tracking:

1). Hidden Form Fields.

2). URL rewriting

3). Cookies

4). HTTP session API

Example:

Letus go for understanding the use of session.

Consider three files A.jsp and B.jsp and Result.jsp

A.jsp file have one textbox to get FirstName as input and OK button.

Screen Shot below

 
B.jsp file have one textbox to get Lastname as input and OK button.

Screen Shot below


Wednesday, October 13, 2010

JSP Implicit Object in jsp


Jsp-implicit object


Introduction:
                        Implicit object means pre-defined object. Jsp provide some implicit object. Already jsp developer has created some object for later use. This object is called implicit object.

What is oops?

Object Oriented Programming is main feature of java. In java every task is performed within the method. The method is defined within the class. To call this method, using object. So we must create object of this class and use new operator to create object. Using object, we call method. So it is called object oriented programming.

A). Create class
B). Create method
C). Create object in main class
D). Using object, call the method.

But java developer feels that some object are needed often. So they created class and created object themselves. So we don’t need to create object separately. We just use object name.method name. Here we keep it in mind which method is used for which purpose.

Note:
            How to call pre defined method?

All predefined method are included within the class. And that class also is included into the package. So we import the package and create the object of the class. Using created object, we can call the method.

For example, we want to get the time. First we import java.util package. Because the method getHours() is included in java.util package. So we include java.util package and create the object for Date class.

Java.util.Date


getHours()

import java.util.*;
class Example
{
            public void display()
{
                        Date d=new Date();
                        System.out.println(d.getHours());
}
}
class Examplemain
{
            public static void main(String args[])
            {
                        Example e=new Example();
                        e.display();
            }
}

Here we import java.util and create object for Date class and using object of the Date class to call the getHours() method.

But if we use predefined boject, there is no need to create object to call method.


They defined eight pre defined object.

1). request
2). response
3). session
4). out
5). application
6). config
7). pageContext
8). page


Implicit Object


type


request


javax.servlet.http.HttpServletRequest(For Http)

javax.servlet.ServletRequest(Not Http)

It is used to retrieve data submitted along with a request.


Implicit Object


type


response


javax.servlet.http.HttpServletResponse(For Http)

javax.servlet.ServletResponse(Not Http)

It is used to send an HTML output to the client.


Implicit Object


type


session


javax.servlet.http.HttpSession
·       session object is associated with request object.


Implicit Object


type


out


javax.servlet.jsp.JspWriter


·       Used for writing data to the output buffer
·       Buffer size can be adjusted or can be turned off using buffer attribute in page directive
·       out object is used in scriptlets


Implicit Object


type


exception


java.lang.Throwable


·       refer to the runtime exception


Implicit Object


type


page

java.lang.Object


  • Represent the this object for the current instance of the jsp


Implicit Object


type


pageContext


Javax.servlet.jsp.PageContext


·       represent the PageContext object for this page.


Implicit Object


type


config


Javax.servlet.ServletConfig


·       Contain servlet configuration data


Implicit Object


type


application


javax.servlet.ServletContext


·        It is used to share information among all usrs of a currently active application


Tuesday, October 12, 2010

JSP- Custom Tag- Body with Attributes


JSP- Custom Tag- Body with Attributes

Introduction:

From Previous post, we have understood how to create custom body tag. From this post, we will learn how to create custom tag with body and attributes. If we create attribute, we will add attribute name when we create tag Handler class.

Procedure:

Step 1:
            Create Project CustomTagProject.

Step 2:
            Create TLD file named as ABody.tld


Successfully Abody.tld file created.
 
Step 3:
            Create Tag handler Class named as Abody

1). Put Tag Handler name i.e. class name as Abody

2). BodyTagSupport in Tag Support Class to Extend


Click Next

1). Select TLD file.
2). Body Content as JSP
3) To add attribute.

               Click New

                        Add New Attribute window will open.

                        Where you give Attribute name as username

                        And select Attribute Type as java.lang.String

            Select required attribute checkbox


Successfully Tag Handler class file created.
 
Step 4:

            Made some changes in ABody.java

package javaclass;

import java.io.IOException;
import javax.servlet.jsp.JspException;
import javax.servlet.jsp.JspWriter;
import javax.servlet.jsp.tagext.BodyContent;
import javax.servlet.jsp.tagext.BodyTagSupport;

public class ABody extends BodyTagSupport
{
    private String username;

    public String getUsername()
    {
        return username;
    }

    public void setUsername(String username)
    {
        this.username = username;
    }

    public int doAfterBody()throws JspException
    {
        try
        {
            BodyContent bc=getBodyContent();
            String body=bc.getString();
            JspWriter out=bc.getEnclosingWriter();
            out.println(getUsername().toUpperCase());
            out.println(body.toUpperCase());
        }
        catch(Exception e)
        {

        }
        return SKIP_BODY;
    }
}
Step 5:

            Create jsp file named as ABody.jsp


Step 6:

Run the jsp file named ABody

Step 7:

Output

Structure of the CustomTagProject


Monday, October 11, 2010

JSP- Custom Tag- Body with Attributes


JSP- Custom Tag- Body with Attributes

Introduction:

From Previous post, we have understood how to create custom body tag. From this post, we will learn how to create custom tag with body and attributes. If we create attribute, we will add attribute name when we create tag Handler class.

Procedure:

Step 1:
            Create Project CustomTagProject.

Step 2:
            Create TLD file named as ABody.tld

JSP Custom Tag with Body


JSP- Custom Tag with Body

Introduction:

Custom tags include jsp components such as text, jsp scriptlets, jsp expression within its body tag are called custom tags with body.

< good:GoodMorning >
suresh goodmoring
< /good:GoodMorning >

The output is the body content is converted into the UpperCase.

We specify custom tag contain body when we are creating TLD file. When we create TLD file, we specify < body-content > element of the TLD as JSP. When we create Custom Tag .we specify < body-content > as empty. Now we are going to create custom tag with body so we specify < body-content > as JSP to indicate that container evaluate the body content of the tag.


Note:
We specify < body-content > as tagdependent, the jsp container should not evaluate the body of the tag but instead pass it to the tag handler for evaluation.


Problem:

< good:GoodMorning >
suresh goodmoring
< /good:GoodMorning >

The output is the body content is converted into the UpperCase.

Procedure:

Step 1:

Create Project named as CustomTagProject (Already we have Created CustomTagProject)

If you are new to Custom Tag, Please refer Custom tag Empty Tag Creation.

Custom Tag – Example For Empty Tag


Step 2:

Create TLD file. Named good.tld

How to create TLD, please refer 


Important:


No need to include coding into the TLD file. The content of the TLD file will be automatically included into the TLD file when we create Tag handler Class.


Step 3:

            Create Tag Handler Class named as GoodMorning.

Select BodyTagSupport because we are going to create Custom tag with body.


Note: we have selected Body Content as JSP.

Step 4:

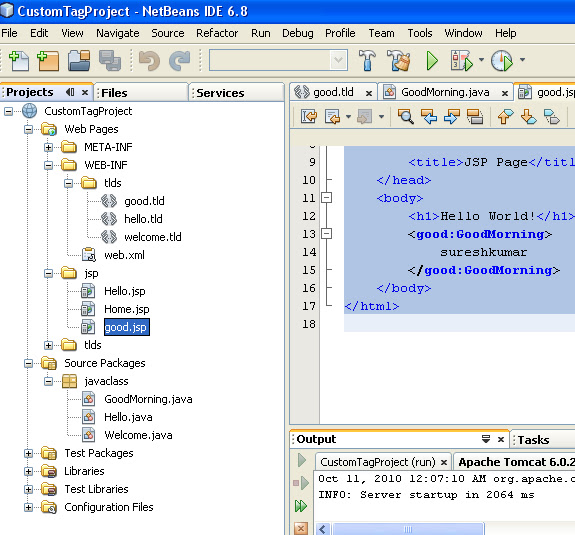
            Create jsp file named as good.jsp.

< %@page contentType="text/html" pageEncoding="UTF-8"% >
< !DOCTYPE HTML PUBLIC "-//W3C//DTD HTML 4.01 Transitional//EN"
http://www.w3.org/TR/html4/loose.dtd >
< %@taglib uri="/WEB-INF/tlds/good" prefix="good" % >
< html >
< head >
< title > JSP good Page < /title >
< /head >
< body >
< h1 > Hello World! < /h1 >
< good:GoodMorning >
sureshkumar
< /good:GoodMorning >
< /body >
< /html >

Step 5:

            Run the good.jsp

Step 6:

            Get Output


Step 7:

            Structure of the CustomTagProject