Saturday, October 2, 2010

JSP-Requirements for running JSP


REQUIREMENTS FOR RUNNING THE JSP

TOMCAT APPLICATION SERVER


There are many version of the tomcat server.

You can download tomcat server from the following apache official site.

www.tomcat.apache.org


If you have tomcat 4 or older version, you must set path in environmental variables.

How to set the Environmental variable if you use tomcat 4.

Step 1:

            Goto desktop


Step 2:
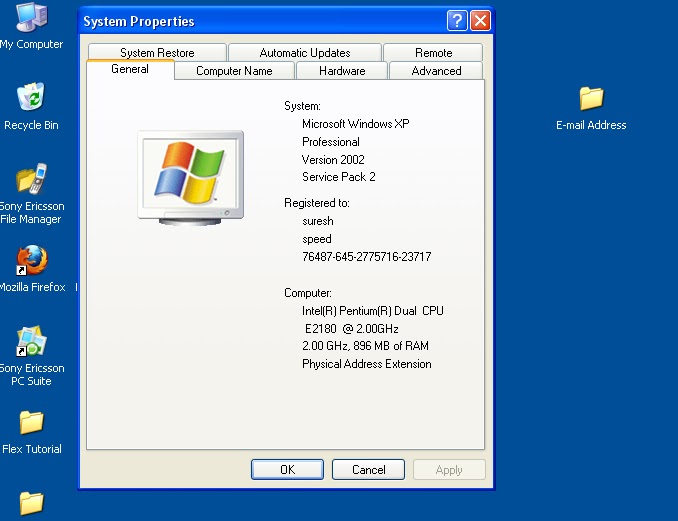
               Right click on the My Computer


In system properties window, you select Advanced in Tabbed panel.


In system properties window, you select Advanced in Tabbed panel.


After select Advanced, you click Environment Variables
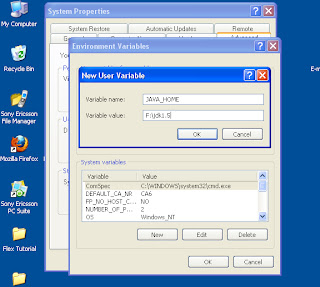
Environmental window will open.


There are two parts here.

1). User variables

2). System variables

You only use user variables

1). CATALINA_HOME

Select New Button. New User Variable window will open. Where you give variable name as CATALINA_HOME and Variable value as F:\Apache. Because I have installed Apache tomcat server in F:\Apache. And click OK.


2). JAVA_HOME
 
            You follow above steps to create another user variable for JAVA_HOME

Variable name     JAVA_HOME

Variable Value    (where you have installed java) F:\jdk1.5


3). PATH
            Create another user variables for PATH

            Variable name                         PATH

            Variable value             F:\jdk1.5\bin; (note put the semicolon)


4). CLASSPATH

            Create another user variable for CLASSPATH

            Variable name                    CLASSPATH

             Variable value      F:\jdk1.5\lib; F:\Apache\lib\ jsp-api.jar; F:\Apache\lib\servlet-api.jar;


Note: if you use Tomcat 4 or older version.
  
If you use latest version such as tomcat 5 or tomcat 6. No need to create environment variables

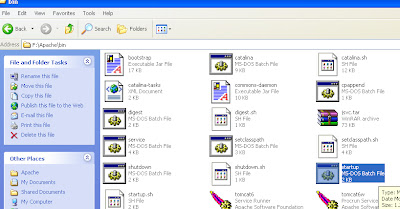
We want to check the server is run properly or not.

Goto F:\Apache\bin\

Select startup


Open the browser

Enter http://localhost:8080 in address bar


How To create Folder For Running jsp


Where to create folder to save jsp file and html file.

Go to Apache Tomcat Folder( where you have installed tomcat)

For Example I have installed           F:\Apache

Open Apache Tomcat Folder.


Open webapps folder


Create New Folder and named something such as suresh as your desire.


Open Folder suresh.

You create WEB-INF Folder

You create jsp Folder for storing jsp

You create html Folder for storing html


Next you have to create web.xml.

Go to back webapps


Open the Folder examples and WEB-INF


Copy the web.xml file and paste into F:\Apache\webapps\suresh\WEB-INF


go back jsp folder

F:\Apache\webapps\suresh\jsp

Create jsp file

Open the notepad

Type the following coding

< html >
< head > < title > jsp example < /title > < /head >
< body >
hai welcome
< %= welcome to jsp wolrd % >
< /body >
< /html >

Start the tomcat server


Open the browser such as windows Internet Explorer or FireFox

                http://localhost:8080/suresh/jsp/welcome.jsp

                You will get output

                Hai welcome

                Welcome to jsp world.


JSP-Introduction of jsp


Introduction Of the JSP (Java Server Pages)

            A web application consists of the presentation and business logic.

            Presentation layer- Web Designer

Business Logic- Web Developer


JSP is used to perform Presentation.

What is the presentation layer?

In web site, what are the pages are interacted with the user or client which pages are called UserInterface. Presentation layer is also known as UserInterface.
                       
                        UserInterface- UI components.


Web designer don’t need to know the business logic. They know HTML pages to design the web pages in terms of the page layout, color, and text.

Presentation logic represents the static content.

Business Logic represents the dynamic content.

A web designer can design the web page by using HTML at the same time the web developer can use java code and other jsp tags to code the business logic. So both web designer and web developer can work independently.


Although we use servlet to perform presentation logic, there are some reasons we use jsp to create presentation logic.


Compiling the jsp page.

A jsp page after compilation generates a servlet and therefore incorporates all servlet functionalities.

Servlet and jsp share common features such as OS(Operating System) independent, create DB web application and server side programming.

Difference Between Jsp And Servlet

Servlet files: combine HTML and servlet( HTML file for the static content and servlet file for dynamic content).

In servlet, a change made to any files, we require to re-compile the servlet.

In jsp, jsp allows java to be embedded directly into an HTML page by using tags. The HTML content and java content can also be placed in separate files. So any changes made to HTML content is automatically compiled and loaded onto the server.

Jsp Life cycle:

When the client browser request for the page, the server sends the request to the JSP engine. JSP engine is part of a web container that compiles a jsp page to servlet.


Once a jsp page is translated to a servet, the container invokes life cycle method.

jspInit(): this method is invoked when the servlet is initialized.

jspService(): this method is invoked when the request for the jsp page is received.

jspDestroy(): this method is invoked before the servlet is removed from the service.


Tuesday, September 28, 2010

Flex with Style sheet Example

Flex Framework- Cascading Style sheet

Introduction:

         We use flex to create attractive and colorful flex UI components. For example, we are going to create multiple buttons with same font size, same font type, same hight, width, color, and corner . we include coding for style sheet between < fx:Style > and < / fx:Style >.

Procedure:

Step 1: create StylePro.mxml application.

Step 2: include following coding into StylePro.mxml


< ?xml version="1.0" encoding="utf-8"? >
< s:Application xmlns:fx="http://ns.adobe.com/mxml/2009"
xmlns:s="library://ns.adobe.com/flex/spark"
xmlns:mx="library://ns.adobe.com/flex/mx" minWidth="955" minHeight="600" >

< fx:Style >
@namespace s "library://ns.adobe.com/flex/spark";
.suresh {font-size: 40pt}

< /fx:Style >

< fx:Style >
@namespace s "library://ns.adobe.com/flex/spark";
@namespace mx "library://ns.adobe.com/flex/mx";
mx|Button {font-size:35pt}
mx|Button {color:red}
mx|Button {text-roll-over-color:yellow}
mx|TextInput {border-color:green}

< /fx:Style >

< mx:Panel layout="horizontal" height="400" width="400" >
< mx:Canvas >
< mx:TextInput id="uname" x="10" y="50" maxChars="25" / >
< mx:Button label = "ok" x="250" y="50" width="120" / >

< /mx:Canvas >
< /mx:Panel >
< /s:Application >

Output


Sunday, September 26, 2010

Flex EventListener


Flex Framework-EventListener

Introduction:
                       
The addEventListener method is used to add event to Flex UI components. Already we have seen how to create UI components. Now we add event to the UI components.

Step 1:

We create textinput UI components.


Step 2:

Add eventlistener to TextInput UI components.

Syntax:

            AddEventListener(type of event,function,usecapture(true or false),priority(0);

Step 3:

Add the following coding into the mxml application.


< ?xml version="1.0" encoding="utf-8"? >
< s:Application xmlns:fx="http://ns.adobe.com/mxml/2009"
xmlns:s="library://ns.adobe.com/flex/spark"
xmlns:mx="library://ns.adobe.com/flex/mx" minWidth="955" minHeight="600" >

< fx:Script >
< ![CDATA[
protected function ok_clickHandler(event:MouseEvent):void
{
ok.addEventListener(MouseEvent.CLICK,mes,false,0);

}
]] >
< /fx:Script >
< fx:Script >
< ![CDATA[
import mx.controls.Alert;
public function mes(event:Event):void
{
Alert.show("Hello You Clicked On TextInput");
}
]] >
< /fx:Script >

< fx:Declarations >
< /fx:Declarations >
< mx:Panel title="Event Listener" height="400" width="400" layout="absolute" >

< mx:Canvas >

< mx:TextInput id="ok" click="ok_clickHandler(event)"/ >

< /mx:Canvas >
< /mx:Panel >
< /s:Application >

Explain:

Textinput box will displayed.

You click the mouse on the textinput.

The click event occurred and the control will go to the ok_clickHandler() function which occur between < fx:Script > and < / fx:Script &gt.

Within the ok_clickHandler() function, we add EventListener to the textinput. Like below

ok.addEventListener(MouseEvent.CLICK,mes,false,0);

ok is the id of the textinput.

We add MouseEvent.Click.

We click on the Textinput and mes() function will called.

public function mes(event:Event):void
{
Alert.show("Hello You Clicked On TextInput");
}
we use Alert class with show method.


Thursday, September 23, 2010

Flex tab navigator Example

Flex Framework TabNavigator

Introduction:

Under mx.containers package TabNavigator class is defined.
Under TabNavigator class TabNavigator container is defined.

Tab Navigators are Navigator containers of flex.
In the following example, three tabs have been created using flex Layout container VBox. We also used the wipe effect behavior..

Example:


Step 1:
Create project named as ValidatorPro

Step 2:
Create ValidatorPro.mxml

Step 3:
Include following coding into the ValidatorPro.mxml

< ?xml version="1.0" encoding="utf-8"? >
< s:Application xmlns:fx="http://ns.adobe.com/mxml/2009"
xmlns:s="library://ns.adobe.com/flex/spark"
xmlns:mx="library://ns.adobe.com/flex/mx" minWidth="955" minHeight="600" >
< fx:Declarations >

< mx:WipeLeft id = 'wipe_left'/ >
< mx:WipeUp id="wipe_up"/ >

< /fx:Declarations >

< mx:Panel title = 'Tab Navigators' width = '100%' height = '100%' >

< mx:TabNavigator width = '100%' height = '100%' >

< mx:VBox label = 'Panel 1' showEffect = '{wipe_left}' >
< mx:Text text = 'You switched Panel1 Tab ' color = '#996600'/ >
< /mx:Vbox >

< mx:VBox label = 'Panel 2' showEffect = '{wipe_left}' >
< mx:Text text = 'You switched Panel2 Tab' color = '#FF9900'/ >
< /mx:Vbox >

< mx:VBox label = 'Panel 3' showEffect = '{wipe_up}' >
< mx:Text text = 'You switched Panel3 Tab' color = '#9966CC'/ >
< /mx:Vbox >

< /mx:TabNavigator >

< /mx:Panel >
< /s:Application >


Step 4:
            Run the Application

Step 5:

            Get the output like below


Tuesday, September 21, 2010

Flex Framework Validator Example


Flex Framework Validator Example

Aim:

We use pre-defined Flex validator to validate different type of data. By using appropriate flex validators to validate the data. Mostly we validate email, phone number, userID, and password.

In the below example, we use two flex pre defined validator such as Email validator and phone validator.
When the user enter the value, the data validator checks the syntax and the type of data entered and the entered data is to be wrong, the corresponding validator generates error message in red text format.

 Procedure:

Step 1:
            Create project named such as ValidatorPro

Step 2:
Include following coding into the ValidatorPro.mxml


< ?xml version="1.0" encoding="utf-8"? >
< s:Application xmlns:fx="http://ns.adobe.com/mxml/2009"
xmlns:s="library://ns.adobe.com/flex/spark"
xmlns:mx="library://ns.adobe.com/flex/mx" minWidth="955" minHeight="600" >
< fx:Declarations >
< mx:PhoneNumberValidator source = '{phoneNumber}'
property = 'text'/ >
< mx:EmailValidator source = '{EmailId}'
property = 'text'/ >

< /fx:Declarations >

< mx:Panel title = 'Flex Validator Control' >

< mx:TextInput id = 'phoneNumber'
text = 'enter valid phone number.'/ >
< mx:TextInput id = 'EmailId'
text = 'suresh@speed.com'/ >

< /mx:Panel >
< /s:Application >


Step 3:
          Run the Application

Step 4:
          Get the Output like below


If you enter invalid phone number the error message will display


If you enter invalid email