Monday, October 11, 2010

JSP Custom Tag With Attributes


JSP- Custom Tag with Attributes


Introduction:
                       Custom tag contains many attributes. For every attribute of custom tag, we need to create a property. We use getXXX() and setXXX() methods to access and set the value for the property in the Tag handler Class.

                       Example:


< hello:Hello username=”sureshkumar”/ >


Here, username is a property of the custom tag. And the value of the username is sureshkumar.


Let us go to create custom tag with attributes.

We use TagSupport class to implement custom tag with attributes.

We include username attributes into the Tag Handler Class.

We also setXXX() for username as setUsername().

We also getXXX() for username as getUsername().

To define a custom tag with attribute in a TLD file, we need to specify that the custom tags contain attributes in the attribute elements of the TLD file. The attribute elemtn contains the following sub-elements.

name: specify the name of the attribute.
required: specify that the attribute is required or optional. If you specify required as true,the attribute value must be present in the JSP page.
rtexprvalue:specify that run-time expression, for example JSP expression can be used for this attribute. Possible  values include true,false,yes,no.


Procedure:

Step 1:
            Create project (Already we have create project named as CustomTagProject)

            You want to know how to create Project to develop the jsp page.
            Refer Following Link


Create Custom Tag – Empty Tag Example


Step 2:
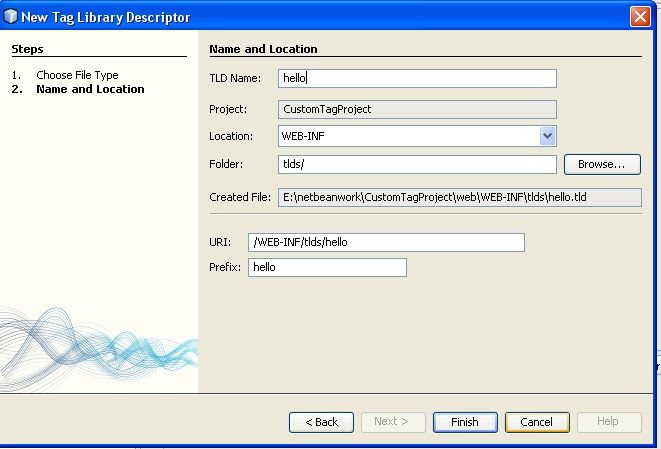
            Create TLD file. Named hello.tld


Step 3:
Create Tag Handler Class named as Hello

Already we have created Welcome Tag Handler Class in creating Empty custom tag example. Follow same steps to create Tag Handler Class.


Below display window is a Tag Handler window. Where you give Tag Handler class name such as Hello.

Tag Support Class to Extend:

Select SimpleTagSupport


Next

Below display window is a New File window, where you select TLD file.

Select Body content as Empty.

Add attributes from here

Click New button right side of the Attribute.

Below window display


OK


 Finish. Tag Handler named Hello will be successfully created.
Note: Made some changes in Hello.java.
Extends TagSupport class.
Add doStartTag() and doEndTag()

Hello.java


package javaclass;

import javax.servlet.jsp.JspWriter;
import javax.servlet.jsp.JspException;
import javax.servlet.jsp.PageContext;
import javax.servlet.jsp.tagext.JspFragment;
import javax.servlet.jsp.tagext.SimpleTagSupport;
import javax.servlet.jsp.tagext.TagSupport;

public class Hello extends TagSupport
{
    private String username;

    public String getUsername()
    {
        return username;
    }

    public void setUsername(String username)
    {
        this.username = username;
    }
    public int doStartTag() throws JspException
    {
        try
        {
           JspWriter out=pageContext.getOut();
           out.println("Welcome"+getUsername());
        }
        catch(Exception e)
        {

        }
        return SKIP_BODY;
    }
    public int doEndTag() throws JspException
    {
        return SKIP_PAGE;
    }
}
                 
Step 4:
             Create jsp file named as Hello.jsp


< %@page contentType="text/html" pageEncoding="UTF-8"% >
< !DOCTYPE HTML PUBLIC "-//W3C//DTD HTML 4.01 Transitional//EN"
http://www.w3.org/TR/html4/loose.dtd >
< %@taglib uri="/WEB-INF/tlds/hello" prefix="hello" % >
< html >
< head >
< title > Hello JSP Page < /title >
< /head >
< body >
< h1 > Hello World! < /h1 >
< hello:Hello username="sureshkumar"/ >
< /body >
< /html >


Step 5:

Run the Hello.jsp

Step 6:

Get Output


Structure of the CustomTagProject


Sunday, October 10, 2010

JSP Custom Tag Empty Custom Tag


JSP- Custom Tag- Empty Tag.

Introduction:

                        Empty custom tag means that does not have any attributes or body.


< mytag:hello/ >


Creating Custom Tag-Empty Tag:


To create custom tag, three components need.

Ø      The tag library descriptor file that maps the XML elements to the tag implementation.

Ø      The tag handler class that defines tags behavior.


Ø      The JSP file that uses the tag library
                

Procedure:

Step 1:
                       Create Project named as CustomTagProject.
                 

Note:Already we have seen how to create the project for developing the web application.


Step 2:
Create two Folders. One for storing jsp files. Another one for storing   Tag Handler class.


Note: Already we have seen how to create Folder in the previous post. Also we have seen where to create Folder for storing jsp file and where to create Folder for storing tag handler class.


Structure of the CustomTagProject


You can save jsp file under jsp folder. And also you can save the tag handler class under javaclass Folder.


Task 1:Tag Library Descriptor file (TLD file)

First task is to identify the java class for the server and to associate it with a particular XML tag name. Let us create TLD file.

Let us see how to create TLD files.

We give TLD file name as myown-taglib.tld

Step1:
Right click on WEB-INF and select New and Other


New File window will open.

Select web under Categories


Also select Tag Library Descriptor(TLD) under File Types


Next


New Tag Library Descriptor window will open.

You give TLD name as welcome.tld

Also give prefix name as wel


After creaing welcome.tld. you can see welcome.tld file like below.

welcome.tld


< ?xml version="1.0" encoding="UTF-8"? >
< taglib version="2.1" xmlns="http://java.sun.com/xml/ns/javaee" xmlns:xsi="http://www.w3.org/2001/XMLSchema-instance" xsi:schemaLocation=http://java.sun.com/xml/ns/javaee http://java.sun.com/xml/ns/javaee/web-jsptaglibrary_2_1.xsd >
< tlib-version > 1.0 < /tlib-version >
< short-name > wel < /short-name >
< uri > /WEB-INF/tlds/welcome < /uri >

< /taglib >


Task 2:Tag Handler Class


Ø      The second task is to define a java class that tells the JSP ENGINE what to do when it sees the tag.

Ø      This class must implements javax.servlet.jsp.tagext.Tag interface.

Ø      Extends TagSupport or BodyTagSupport

Let us go to create java class that display “welcome India”
Right click on javaclass. And select New and Other.


New File window will open.

Where you select web under categories

And also select Tag Handler under File types


Next


New Tag Handler window will open.
You give Tag Handler name as Welcome.


Next


New File window will open.


Where you select TLD

Browse and select TLD under WEB-INF\tlds\welcome.tld

Select Body Content: empty

Finish


Welcome.java file is successfully created.

Welcome.java


package javaclass;

import javax.servlet.jsp.JspWriter;
import javax.servlet.jsp.JspException;
import javax.servlet.jsp.tagext.JspFragment;
import javax.servlet.jsp.tagext.SimpleTagSupport;
import javax.servlet.jsp.tagext.TagSupport;

public class Welcome extends TagSupport
{

    public int doStartTag() throws JspException
    {
        try
        {
            JspWriter out=pageContext.getOut();
            out.println("Welcome India");
        }
        catch(Exception e)
        {

        }
        return SKIP_BODY;
    }
    public int doEndTag() throws JspException
    {
        return SKIP_PAGE;
    }

}


Create JSP file


Create jsp file  -- Home.jsp

Let us see how to create Home.jsp

Right click on jsp Folder.


New File window will open.

Where you select web under categories and select JSP under File Types.


Next

New JSP File window will open.


Finish

Home.jsp file is successfully created.

In Home.jsp, we include taglib directive.

How to include Taglib directive.

< %@taglib uri="/WEB-INF/tlds/welcome" prefix="wel" % >

We create jsp file. We define taglib tag to include custom tag into jsp.


Include following jsp coding into the Home.jsp

< %@taglib uri="/WEB-INF/tlds/welcome" prefix="wel" % >
< %@page contentType="text/html" pageEncoding="UTF-8"% >
< !DOCTYPE HTML PUBLIC "-//W3C//DTD HTML 4.01 Transitional//EN"
http://www.w3.org/TR/html4/loose.dtd >

< html >
< head >
< title > JSP Home Page < /title >
< /head >
< body >
< h1 > Hello World! < /h1 >
< wel:Welcome/ >
< /body >
< /html >


Run the Home.jsp

Right click on Home.jsp and select Run File.


You get output


Strutcture Of The CustomTagProject


JSP Custom Tag


JSP-Custom Tag

Introduction:
                        Custom tag is user-defined tag that enables us to minimize complex and repetitive business logic in jsp by creating the reusable components, which can be used in another application.

package:
                        javax.servlet.jsp.tagext;

Custom tag API:

Custom tag API consists of classes and interfaces of the javax.servlet.jsp.tagext that are used to create custom tag.

Interfaces:

1). Tag

2). IterationTag

3). BodyTag

Classes:

1). BodyContent

2). TagSupport

3). BodyTagSupport

4). TagData

5). TagInfo

6). TagLibraryInfo

7). TagVariableInfo         

Tag Interface


Tag Interface has many methods.

1). doStartTag()

2). doEndTag()

3). release()

4). setPageContext()

5). setParent()

6). getParent()


                                                            IterationTag


The IterationTag interface extends Tag Interface.


                           doAfterBody()

                           
                            Re-evaluation of the body content of custom tag


                                                           BodyTag


The BodyTag interface  extends IterationTag


This interface defines method that enable ag handler to manipulate the body content of custom tag.

1). doInitBody

2). setBodyContent()


Type of custom tag


1). Custom Tag- Empty Tag


2). Custom Tag- tag with Attributes


3). Custom Tag- tag with body


4). Custom Tag- nested Tags


Saturday, October 9, 2010

JSP Login Example


JSP Login Example

Problem:

            Get input such as username and password from user.

            Check given username as sureshkumar and password as murugan.

Solution:

            Step 1:

                        Create jsp page(Home.jsp)

                        Get username and password from user.

Home.jsp


< %@page contentType="text/html" pageEncoding="UTF-8"% >
< !DOCTYPE HTML PUBLIC "-//W3C//DTD HTML 4.01 Transitional//EN"
http://www.w3.org/TR/html4/loose.dtd >

< html >
< head >
< title > JSP Home < /title >
< /head >
< body >
< h1 > Login Example < /h1 >
< form method="post" action=http://localhost:8084/DataBasePro/jsp/validate.jsp >
< table >
< tr >

< td > UserName < /td >
< td > < input type="text" name="uname" > < /td >

< /tr >

< tr >
< td > Password < /td >
< td > < input type="password" name="pwd" > < /td >
< /tr >

< tr >
< td > < input type="submit" value="Login" > < /td >
< td > < input type="reset" value="Clear" > < /td >
< /tr >
< /table >
< /form >
< /body >
< /html >


validate.jsp

< %@page contentType="text/html" pageEncoding="UTF-8"% >
< !DOCTYPE HTML PUBLIC "-//W3C//DTD HTML 4.01 Transitional//EN"
http://www.w3.org/TR/html4/loose.dtd >

< html >
< head >
< title > JSP Validate Page < /title >
< /head >
< body >
< h1 > Login Example < /h1 >

< %
String username=request.getParameter("uname");
String password=request.getParameter("pwd");

if(username.equals("sureshkumar")&&(password.equals("murugan")))
{
out.println("You Are Valid User");
}
else
{
out.println("You Are Not Valid User");
}
% >
< /body >
< /html >


Explain:


            Using Home.jsp, we will get username and password.


Using validate.jsp, we will check the given username as sureshkumar and password as murugan. If it is true, the You Are Valid User message will display.
Otherwise, the You Are Not Valid User message will display.


Note: you give username as suresh , you will get message You Are Not Valid User.

Friday, October 8, 2010

JSP delete query using JDBC


JSP- Delete Query using JDBC

Aim:

            Using JDBC, we will delete the record from mysql database.

Problem:

            Already we insert many records in exam table.

            Now we have to delete suresh records.

Procedure:


Step 1:

            Load the Driver

            Class.forName(“com.mysql.jdbc.Driver”);

Step 2:

            Create Connection

            String driver=”jdbc:mysql://localhost/example”;

            Connection con=DriverManager.getConnection(driver,”username”,”password”);


Step 3:

            Create Statement

            Statement stmt=con.createStatement();

Step 4:

            Execute Query

            String sql=”delete from exam where student_name=’suresh’ “;

            stmt.executeUpdate(sql);


Step 5:
            Create jsp file

            I have given jsp file name as DeleteExample.

            Add following coding into DeleteExample.


< %@page contentType="text/html" pageEncoding="UTF-8"% >
< !DOCTYPE HTML PUBLIC "-//W3C//DTD HTML 4.01 Transitional//EN"
http://www.w3.org/TR/html4/loose.dtd >
< %@page import="java.sql.*" % >
< html >
< head >
                     < title > Java DataBase Connectivity Example-Delete Query < /title >
< /head >
< body >
< %!
                     Connection con=null;
                      ResultSet rs=null;
                     Statement stmt=null;
% >
<%
try
{
                       Class.forName("com.mysql.jdbc.Driver");
}
catch(Exception e)
{
                        out.println(e.getMessage());
}
try
{
         con=DriverManager.getConnection("jdbc:mysql://localhost/example","root","sure");
         stmt=con.createStatement();
         int i=stmt.executeUpdate("delete from exam where student_name='suresh'");
         if(i==1)
         {
                out.println("Successfully Deleted");
          }
          else
          {
                  out.println("Error For Inserted");
           }
}

catch(Exception e)
{
               out.println(e.getMessage());
}
finally
{
         con.close();
         stmt.close();
}
% >
< /body >
< /html >


Step 6:

Include mysql-connector.jar

Already we have included mysql-connector.jar into our project. So no need to include again.

Step 7:

Run the Application

Already I have explained how to run the application.

Step 8:

Get the output