Under mx.containers package TabNavigator class is defined.
Under TabNavigator class TabNavigator container is defined.
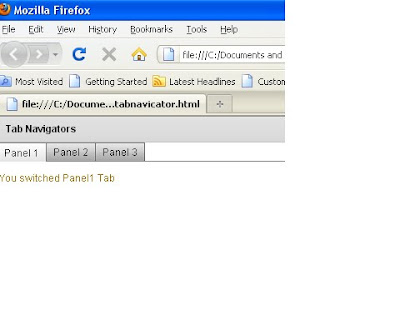
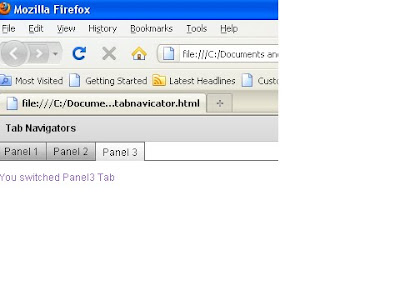
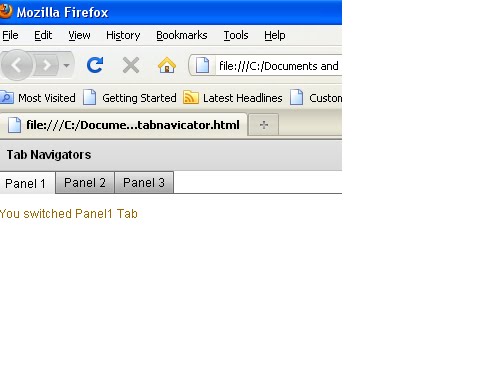
Tab Navigators are Navigator containers of flex.
In the following example, three tabs have been created using flex Layout container VBox. We also used the wipe effect behavior..
Example:
Step 1:
Create project named as ValidatorPro
Step 2:
Create ValidatorPro.mxml
Step 3:
Include following coding into the ValidatorPro.mxml
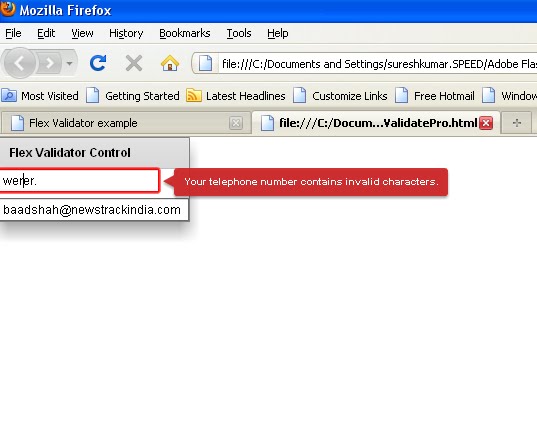
We use pre-defined Flex validator to validate different type of data. By using appropriate flex validators to validate the data. Mostly we validate email, phone number, userID, and password.
In the below example, we use two flex pre defined validator such as Email validator and phone validator.
When the user enter the value, the data validator checks the syntax and the type of data entered and the entered data is to be wrong, the corresponding validator generates error message in red text format.
Procedure:
Step 1:
Create project named such as ValidatorPro
Step 2:
Include following coding into the ValidatorPro.mxml
Alert box is dialog box that appears on window with some message. Alert Box is referred to as pop-up window.
Alert is class that is defined inside the mx:controls package. The pop-up window appears when show () method of the Alert Class is called.
Procedure: Step 1:
Create Project named AlertPro
Open Flash Builder 4
File--New—Flex Project
New Flex Project window will open.
where you give project name such as AlerPro
Next—Next—Finish
AlertPro project successfully created.
Note: automatically AlertPro.mxml file created.
Step 2:
Include following coding into the AlertPro.mxml
1. Open Control Panel
2. Click the System icon then a window will pop up
3. Go to the Advanced tab
4. Click the "Environment Variables"
5. Select "New" in System Variables.
6. In the Variable Name textbox type JAVA_HOME
7. In the Variable Location textbox type the JDK directory
Running Installed Sample Applications.
1. Start Tomcat by double clicking [blazeds directory]tomcat\bin\startup.bat
2. Now, check if it works by running http://localhost:8400/ in your browser.
You will get output like below
Configure BlazeDS
Open [blazeds directory]tomcat\webapps\
Copy the blazeds folder and change the name it as "yoga".
Open "yoga" folder.
You should be able to see 2 folders. WEB-INF and META-INF.
Inside WEB-INF, open web.xml
Remove comment < !—begin rds and remove end rds -- >
And change to false like below
….
….
< init-param >
< param-name > useAppserverSecurity < /param-name >
< param-value > false < /param-value >
< /init-param >
….
….
6. Inside the flex folder, open remoting-config.xml and add the coding.
Note: The destination and the source values are what we'll be using in flex when we create the RemoteObject tag.
Creating the HelloWorld Class
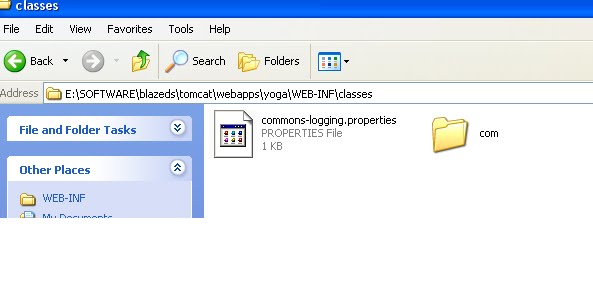
1.Create a package com.
2.Inside your Package create a HelloWorld Class. Your HelloWorld.java should look like this:
package com;
public class HelloWorld
{
public String sayHello(String name)
{
return "Hello, " + name;
}
}
3.compile the HelloWorld.java
& > javac –d . HelloWorld.java
4.you get HelloWorld.class file inside com.HelloWorld.class
To understand how to connect Flex with java from this post.
Requirements:
1). Download BlazeDS
2). Flash Builder
3). Jdk(above 1.5)
Procedure:
Step 1:
Setting up Environment Variable in Windows
1. Open Control Panel
2. Click the System icon then a window will pop up
3. Go to the Advanced tab
4. Click the "Environment Variables"
5. Select "New" in System Variables.
6. In the Variable Name textbox type JAVA_HOME
7. In the Variable Location textbox type the JDK directory