Flex Framework CheckBox with ActionScript
Aim:
A check box is a box on a web page that can be checked by a user. Unlike a radio button, more than one box can be checked at once.
Form this post; we can understand which checkbox will be selected using actionscript.
Procedure:
Step 1:
Open Eclipse IDE
Step 2:
Crete Project already we have created project named as FlexPro
Step 3:
Create file CheckboxScript.mxml
Include following coding into the CheckboxScript.mxml
< ?xml version = '1.0' encoding = 'utf-8'? >
< mx:Application xmlns:mx = 'http://www.adobe.com/2006/mxml' >
< mx:Script >
< ![CDATA[
private function display(event:Event):void
{
if(Reading.selected)
{
dis.text="You select Reading Books";
}
if(!Reading.selected)
{
dis.text="You Are Not Select Reading ";
}
if(Playing.selected)
{
dis1.text="You Select Playing Cricket ";
}
if(Watching.selected)
{
dis2.text="You select watchng tv";
}
}
]] >
< /mx:Script >
< mx:Panel title="CheckBox With ActionScript" height="500" width="500" >
< mx:Label id="dis" text="" / >
< mx:Label id="dis1" text="" / >
< mx:Label id="dis2" text="" / >
< mx:CheckBox id="Reading" label="Reading books"/ >
< mx:Button label="OK" click="display(event);"/ >
< /mx:Panel >
< /mx:Application >
Explain:
We create three checkbox and button.
We select checkbox and click OK button.
The control goes to actionscript and call display function. Because in button, we use click=”display(event)”.
We use if control statement, to decide which checkbox is selected.
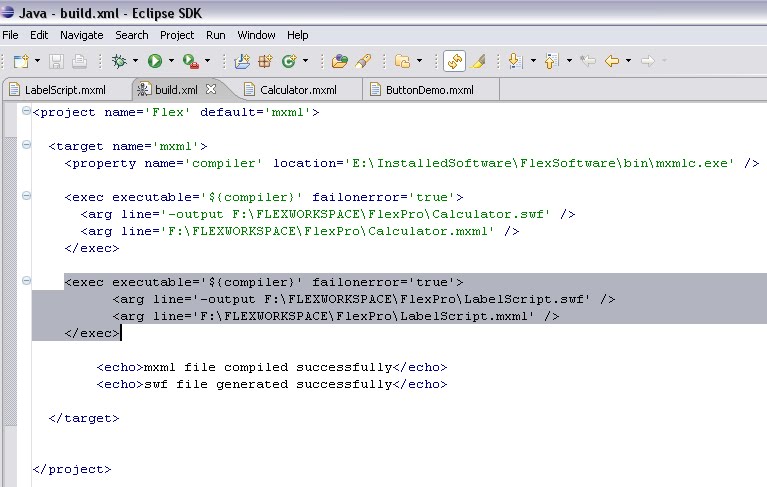
Step 4:
Already we have build.xml. so no need to create build.xml. you just include the following coding into the build.xml
……
……
< exec executable='${compiler}' failonerror='true' >
< arg line='-output F:\FLEXWORKSPACE\FlexPro\CheckboxScript.swf' / >
< arg line='F:\FLEXWORKSPACE\FlexPro\CheckboxScript.mxml' / >
< /exec >
……
……
Step 5:
Run the application
Step 6:
You get output like below
You select Playing Cricket and click OK button.
The message will be displayed in Label 2
Struts 2.x
Flex Framework
JSP-Java Server Pages
Hibernate 3.2.5
Android
Wednesday, August 11, 2010
Thursday, August 5, 2010
Flex Framework TextInput with ActionScript
Aim:
We use Label,TextInput and Button components to create Flex Application.
We enter any value into the TextInput, and click the OK button, the entered the value will be display on the Label. This is our problem.
Let’s go to the Flex application.
Procedure:
Step 1:
Open eclipse.
Step 2:
Create TextInput.mxml
Include following coding into TextInput.mxml
< ?xml version = '1.0' encoding = 'utf-8'? >
< mx:Application xmlns:mx = 'http://www.adobe.com/2006/mxml' >
< mx:Script >
< ![CDATA[
private function display(event:Event):void
{
dis.text=disname.text;
}
]] >
< /mx:Script >
< mx:Panel title="TextInput Demo Plus ActionScript"
height="500" width="500"
backgroundColor="Blue" layout="horizontal" >
< mx:Canvas >
< mx:Label text="" id="dis" color="Red" fontSize="25" x="20" y="50"/ >
< mx:TextInput id="disname" x="20" y="100"/ >
< mx:Button label="OK" click="display(event);" x="20" y="150"/ >
< /mx:Canvas >
< /mx:Panel >
< /mx:Application >
Step 3:
Include following coding into build.xml
….
< exec executable='${compiler}' failonerror='true' >
< arg line='-output F:\FLEXWORKSPACE\FlexPro\TextInput.swf' / >
< arg line='F:\FLEXWORKSPACE\FlexPro\TextInput.mxml' / >
< /exec >
….
Step 4:
Run the Application
Already I have explained how to run the flex application using build.xml.
Step 5:
Get output
Go to where you specify to store swf file.
Open TextInput.swf
Ouput
you enter any and click OK
I enter S.Sureshkumar,M.Sc,M.Phil,
you get
Wednesday, August 4, 2010
Flex Framework Label with ActionScript
Flex Framework Label with Actionscript
Aim:
We use label and button UI components. We click on OK button the message “Hello Flex Framework” will be displayed.
Procedure:
Step 1:
Create Project FlexPro. Using eclipse.
From previous post, we can understand how to create project.
Step 2:
Create File LabelScript.mxml
Include following coding into the LabelScript.mxml
< ?xml version = '1.0' encoding = 'utf-8'? >
< mx:Application xmlns:mx = 'http://www.adobe.com/2006/mxml' >
< mx:Script >
< ![CDATA[
private function display1(event:Event):void
{
display.text="Hello Flex Framework";
}
]] >
< /mx:Script >
< mx:Panel title="Label Demo Plus ActionScript"
height="500" width="500"
backgroundColor="Blue" >
< mx:Label text="" id="display" color="Red" fontSize="25"/ >
< mx:Button label="OK" click="display1(event);"/ >
< /mx:Panel >
< /mx:Application >
Note:
We include actionscript coding between
< mx:Script >
< /mx:Script >
< mx:Script >
< ![CDATA[
private function display1(event:Event):void
{
display.text="Hello Flex Framework";
}
]] >
< /mx:Script >
Step 3:
Include following coding into the build.xml
….
< exec executable='${compiler}' failonerror='true' >
< line='-output F:\FLEXWORKSPACE\FlexPro\LabelScript.swf' / >
< line='F:\FLEXWORKSPACE\FlexPro\LabelScript.mxml' / >
< /exec >
….
Step 4:
Run the Application
Click build.xml
Inside build.xml
Right click inside build.xml and select Run As – 1 Ant build
Step 5:
Goto the where you stored LabelScript.swf file.
Open LabelScript.swf in any Browser.
You get output like below
Tuesday, August 3, 2010
Flex Framework Registeration Form using UI
Flex Framework Registration form
Aim:
Use Label and TextInput and checkbox and combobox and radio button and button to develop the Registration form.
Procedure:
Step 1:
Create project FlexPrject
Step 2:
Create file RegisterDemo.mxml
Include following coding into the RegisterDemo.mxml
< ?xml version = '1.0' encoding = 'ISO-8859-1'? >
< mx:Application xmlns:mx = 'http://www.adobe.com/2006/mxml' >
< mx:Panel title="Register Form" height="500" width="500" >
< mx:Canvas >
< mx:Label text="Applicant Name" id="aname" x="10" y="30"/ >
< mx:TextInput id="apname" x="140" y="30"/ >
< mx:Label text="Select Country" id="countryr" x="10" y="80"/ >
< mx:ComboBox id="country" x="140" y="80" >
< mx:Array >
< mx:String > India < /mx:String >
< mx:String > Pakistan < /mx:String >
< mx:String > Columbo < /mx:String >
< /mx:Array >
< /mx:ComboBox >
< mx:Label id="sex" x="10" y="130" text="Sex"/ >
< mx:RadioButtonGroup id="ssex"/ >
< mx:RadioButton id="male" label="Male" x="140" y="130" group="{ssex}"/ >
< mx:RadioButton id="female" label="FeMale" x="200" y="130" group="{ssex}"/ >
< mx:Label id="hobby" text="Hobby" x="10" y="180"/ >
< mx:CheckBox id="reading" label="Reading Books" x="140" y="180"/ >
< mx:CheckBox id="playing" label="Playing Cricket" x="260" y="180"/ >
< mx:CheckBox id="watching" label="Watching TV" x="380" y="180"/ >
< mx:Label id="address" text="Address" x="10" y="230"/ >
< mx:TextArea id="Address" width="240" height="100" x="137" y="230"/ >
< /mx:Canvas >
< /mx:Panel >
< /mx:Application >
Step 3:
Include following coding into the build.xml
…..
< exec executable='${compiler}' failonerror='true' >
< arg line='-output F:\FLEXWORKSPACE\FlexProject\RegisterDemo.swf' / >
< arg line='F:\FLEXWORKSPACE\FlexProject\RegisterDemo.mxml' / >
< /exec >
…..
Step 4:
Run the Application
Step 5:
Open RegisterDemo.swf
Note:
you specify the directory to store swf file in build.xml
Get output
Monday, August 2, 2010
Flex Framework checkbox Demo
Flex Framework Checkbox Demo
Aim:
A check box is a box on a web page that can be checked by a user. Unlike a radio button, more than one box can be checked at once.
Procedure:
Step 1:
Create project
Step 2:
Create file CheckBoxDemo.mxml
Include following coding into the CheckBoxDemo.xml
< ?xml version = '1.0' encoding = 'ISO-8859-1'? >
< mx:Application xmlns:mx = 'http://www.adobe.com/2006/mxml' >
< mx:Panel title="CheckBox Demo" height="500" width="500" >
< mx:Canvas >
< mx:CheckBox id="reading" x="10" y="80" label="Reading Books"/ >
< mx:CheckBox id="playing" x="10" y="130" label="Playing Cricket"/ >
< mx:CheckBox id="watching" x="10" y="180" label="Watching TV" / >
< /mx:Canvas >
< /mx:Panel >
< /mx:Application >
Step 3:
Configure in build.xml
Include following coding into the build.xml
….
….
< exec executable='${compiler}' failonerror='true' >
< arg line='-output F:\FLEXWORKSPACE\FlexProject\CheckBoxDemo.swf' / >
< arg line='F:\FLEXWORKSPACE\FlexProject\CheckBoxDemo.mxml' / >
< /exec >
….
….
Step 4:
Run the Application
Step 5:
Output
Sunday, August 1, 2010
Flex Framework Combo Box and Radio Button Demo
Flex Framework Combo Box and Radio button
Aim:
A combo box is a commonly used graphical user interface. A combo box is a component with a drop-down arrow that users click to display an associated list of choices
A radio button or option button is a type of graphical user interface element that allows the user to choose only one of a predefined set of choices.
Procedure:
Step 1:
Create Project Already we have created project named such as FlexProject.
Step 2:
Create file ComboBoxDemo.mxml. Already we have seen how to create file. So you follow some steps to create file.
Include following coding into ComboBoxDemo.mxml
Subscribe to:
Posts (Atom)