Sunday, May 9, 2010

Struts Application-isCancelled() method


Struts Application-cancel() method

Aim:
Sometimes the user or client want to cancel the operation, Struts Framework provide special html tag to perform this operation.

Procedure:
Step_1:
                   Include  &lt html:cancel / &gt tag into any jsp file.
Step_2:
                   Include actionforms I have used cancelForm as actionforms.


package actionforms;

import javax.servlet.http.HttpServletRequest;
import org.apache.struts.action.ActionErrors;
import org.apache.struts.action.ActionMapping;
import org.apache.struts.action.ActionMessage;

public class cancelForm extends org.apache.struts.action.ActionForm
{
   
  private String Name;

    public String getName()
    {
        return Name;
    }

    public void setName(String Name)
    {
        this.Name = Name;
    }
 
}       


Step_3:

Create Action class I have named as cancelAction

Include following programming code.

package actions;

import actionforms.cancelForm;
import javax.servlet.http.HttpServletRequest;
import javax.servlet.http.HttpServletResponse;

import org.apache.struts.action.Action;
import org.apache.struts.action.ActionForm;
import org.apache.struts.action.ActionMapping;
import org.apache.struts.action.ActionForward;

public class cancelAction extends org.apache.struts.action.Action
{


public ActionForward execute(ActionMapping mapping, ActionForm form,
HttpServletRequest request, HttpServletResponse response)
throws Exception
{

        if(isCancelled(request))
       {
              return mapping.findForward("home");
       }

        cancelForm sform=(cancelForm)form;

        request.setAttribute("name",sform.getName());

        return mapping.findForward("welcome");

   }
}


Step_:4

Creating jsp files.

cancel.jsp


< %@ taglib uri="/WEB-INF/struts-bean.tld" prefix="bean" % >
< %@ taglib uri="/WEB-INF/struts-html.tld" prefix="html" % >
< %@ taglib uri="/WEB-INF/struts-logic.tld" prefix="logic" % >
< html>
< head > < title > JSP Page < /title > < /head >
< body >
< html:form action="/cancel" >

< html:text property="name"/ >

< html:submit/ > < html:cancel value="ignore"/ >

< /html:form >
< /body >
< /html >


Step_5:

Creating home.jsp


< %@ taglib uri="/WEB-INF/struts-bean.tld" prefix="bean" % >
< %@ taglib uri="/WEB-INF/struts-html.tld" prefix="html" % >
< %@ taglib uri="/WEB-INF/struts-logic.tld" prefix="logic" % >
< html>
< head > < title > JSP Page < /title > < /head >
< body >

Hello! This is Home

< /body >

< /html >


Step_6:

          Creating welcome.jsp


< html >

< head > < title > JSP Page < /title > < /head >

< body >

Welcome:< %= request.getAttribute(“name”) % >

< /body >

< /html >


Step_7:

Configure Struts-config.xml


Step_8:

Run the cancel.jsp file.

If you click cancel button the control gose to home.jsp.

Otherwise the control goes to welcome.jsp

Conclusion:

From This Post We understood how to perform cancel operation.

The action handler check the iscancelled() method is execute, if it was inside the block will execute.

Do You Have Any Query

Post Comments


Struts Application-File Upload and Download

 
Struts Application-File Upload
Aim:
     To browse the file from the hard disc and save the file into hard disk using file in  
          struts framework.   
Procedure:

            1). Createing actionform

            2). Creating action

            3). Creating jsp file

            4). Configure Struts-config.xml
Step_1:

            Creating actionform

I think you are very familiar how to create actionform.

Create actionform (I have used actionform as fileForm)

import org.apache.struts.upload.FormFile;

Include

Private FormFile thefile;

Create setter and getter method for private FormFile thefile;


package actionforms;

import javax.servlet.http.HttpServletRequest;
import org.apache.struts.action.ActionErrors;
import org.apache.struts.action.ActionMapping;
import org.apache.struts.action.ActionMessage;
import org.apache.struts.upload.FormFile;
public class fileForm extends org.apache.struts.action.ActionForm
{

private FormFile thefile;

public FormFile getThefile()
{
return thefile;
}
public void setThefile(FormFile thefile)
{
this.thefile = thefile;
}

}

Step_2:

            Creating action

            Create action usually (I have used action as fileAction)

            Include following coding.

package actions;

import actionforms.fileForm;
import javax.servlet.http.HttpServletRequest;
import javax.servlet.http.HttpServletResponse;
import java.io.*;
import org.apache.struts.action.Action;
import org.apache.struts.action.ActionForm;
import org.apache.struts.action.ActionMapping;
import org.apache.struts.action.ActionForward;
import org.apache.struts.upload.FormFile;
public class fileAction extends org.apache.struts.action.Action
{
   
   
    public ActionForward execute(ActionMapping mapping, ActionForm  form,
            HttpServletRequest request, HttpServletResponse response)
            throws Exception
    {
        fileForm sform=(fileForm)form;
       
        FormFile myFile=sform.getThefile();
       
        String filename=myFile.getFileName();
       
        String contenttype=myFile.getContentType();
       
        int filesize=myFile.getFileSize();
       
        String filepath=getServlet().getServletContext().getRealPath("/")+"jsp";
       
        byte[] filedata=myFile.getFileData();
       
        if(!filename.equals(""))
        {
            File fileToCreate = new File(filepath,filename);
                         
                    if(!fileToCreate.exists())
                    {
                      FileOutputStream fileOutStream = new FileOutputStream(fileToCreate);
                      fileOutStream.write(myFile.getFileData());
                      fileOutStream.flush();
                      fileOutStream.close();

                    }
        }
        request.setAttribute("filename", filename);
       
        return mapping.findForward("success");
       
    }
}


Step_3:

Creating jsp (I have used as Home.jsp)

< %@ taglib uri="/WEB-INF/struts-bean.tld" prefix="bean" % >
< %@ taglib uri="/WEB-INF/struts-html.tld" prefix="html" % >
< %@ taglib uri="/WEB-INF/struts-logic.tld" prefix="logic" % >

< html >
< head > < title>My JSP 'sureshform.jsp' starting page < /title >
< /head >
< body >
< html:form action="/fileaction" method="post" enctype="multipart/form-data" >

< html:file property="thefile"> < /html:file >
< html:submit > < /html:submit >

< /html:form >
< /body >
< /html >


Creating jsp for download(I have used as download.jsp)

< %@ taglib uri="/WEB-INF/struts-bean.tld" prefix="bean" % >
< %@ taglib uri="/WEB-INF/struts-html.tld" prefix="html" % >
< %@ taglib uri="/WEB-INF/struts-logic.tld" prefix="logic" % >


< jsp:directive.page import="java.util.Vector"/ >

< html >


< body >
< %

String filename=(String) request.getAttribute("filename");
out.println(filename);
% >
< a href="jsp/<%= filename %>" > Download
< /body >

< /html >


Step_4:

Configure Struts-config.xml


Step_5:

Run Home.jsp


Conclusion:

                   From this post we have understood how to upload the file. and also how to download from

                  uploaded file.

                  Any Query , post comment.


Saturday, May 8, 2010

Struts Application-JavaDataBaseConnectivity-Insert


Struts Application- Java DataBase Connectivity
Aim:
            This post illustrate how to connect struts application with mysql database.
Problem:
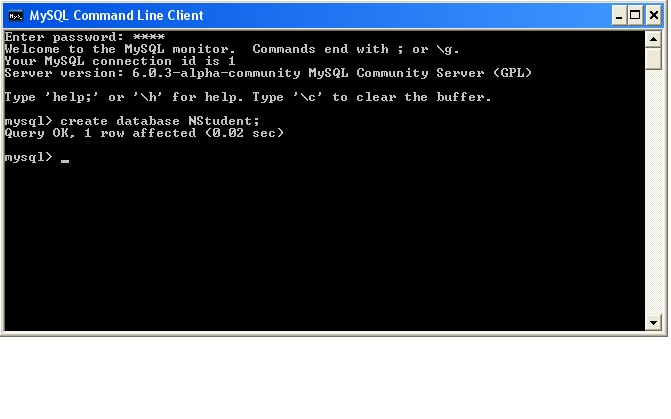
            1). Create NStudent database in mysql
            2). Create NStudent table in mysql
            3). To insert the data into the NStudent table in mysql.

Procedure:
            Step_1:
                         Create NStudent Database
                        use create database database_name;
                        We use database name as NStudent. 


Step_2:
Use database name
Use keyword is used to use already created database.

Step_3:
Create NStudent Table
Use Create table table_name(stu_name varchar(40),stu_rollno int);


Step_4:

Create Struts Project (I have used project name as NStudent)

Already I have explained how to create Struts Project using netbean.


Step_5:

Create Folder for

1). Actionforms

2). Actions

3). Vo

4). Bl

5). Dbcon


Step_6:

Create java class for dbcon.

Select dbcon and right click and New and Other. Where you select java under categories and java class under file types and click Next . where New java class window will open. You give java class name.(I have used as Dbcon) and Finish.
You insert below code in Dbcon

package dbcon;
import java.sql.*;

public class Dbcon
{
public static Connection getConnection()throws SQLException
{
          Connection con=null;
          Statement stmt=null;
          try
         {
               Class.forName("com.mysql.jdbc.Driver");
         }
         catch(Exception e)
        {
             System.out.println("Class Load Error");
        }
        try
        {

            con=DriverManager.getConnection("jdbc:mysql://localhost/NStudent","root","sure");

       }
       catch(Exception e)
       {
             System.out.println("Connection Create Error");
       }
     return con;
   }
}


Step_7:

            Create actionform

            I have used studentForm as actionform

            Already I have explained how to create actionforms in Strtus application-Fisrt  

Hello World.

You insert student_name and rollno;

Create getter and setter for student_name and rollno

package actionforms;

import javax.servlet.http.HttpServletRequest;
import org.apache.struts.action.ActionErrors;
import org.apache.struts.action.ActionMapping;
import org.apache.struts.action.ActionMessage;

public class studentForm extends org.apache.struts.action.ActionForm
{
   
   private String student_name;
   private int rollno;

    public int getRollno()
    {
        return rollno;
    }

    public void setRollno(int rollno)
    {
        this.rollno = rollno;
    }

    public String getStudent_name()
    {
        return student_name;
    }

    public void setStudent_name(String student_name)
    {
        this.student_name = student_name;
    }
  
}


Step_8:

   Create vo(Value Object)

   Right click on vo floder.

   New and other and java under categories and select java under file types.

   You give java class name.(I have used as stuvo).

   Finish.

        You insert

        Private String student_name;

        Private int rollno;

        Create setter and getter method for student_name and rollno.

        Like below.


package vo;

import java.io.Serializable;

public class stuvo implements Serializable
{
    private String student_name;
    private int rollno;
     public int getRollno()
    {
        return rollno;
    }
     public void setRollno(int rollno)
    {
        this.rollno = rollno;
    }
     public String getStudent_name()
    {
        return student_name;
    }
     public void setStudent_name(String student_name)
    {
        this.student_name = student_name;
    }
      
}


Step_9:

          Create bl(Business Logic)

         Right click on bl folder.

         Select new and other and java and java class.

package bl;

import dbcon.Dbcon;
import vo.stuvo;
import java.sql.*;

public class stubl
{
    Connection con=null;
    Statement stmt=null;
    String msg="";
    String sql="";
    public String insert(stuvo vo)
    {
        try
        {
            con=Dbcon.getConnection();
       
        }
        catch(Exception e)
        {
            System.out.println("Connection Creating Error");
        }
        try
        {
            stmt=con.createStatement();
            sql="insert into NStudent values('"+vo.getStudent_name()+"','"+vo.getRollno()+"')";
            int i=stmt.executeUpdate(sql);
            if(i==1)
            {
                msg="success";
            }
            else
            {
                msg="failure";
            }
        }
        catch(Exception e)
        {
            System.out.println("Error");
        }
        return msg;
    }
}      


Step_10:

            Create action class.

            I have already explained how to create action class.

            I have used  studentAction as actionform

            I have used /student as Action path.


 package actions;

import actionforms.studentForm;
import bl.stubl;
import javax.servlet.http.HttpServletRequest;
import javax.servlet.http.HttpServletResponse;

import org.apache.struts.action.Action;
import org.apache.struts.action.ActionForm;
import org.apache.struts.action.ActionMapping;
import org.apache.struts.action.ActionForward;
import vo.stuvo;

public class studentAction extends org.apache.struts.action.Action
{
   
   
    public ActionForward execute(ActionMapping mapping, ActionForm  form,
            HttpServletRequest request, HttpServletResponse response)
            throws Exception
    {
        studentForm sform=(studentForm)form;
       
        stuvo vo=new stuvo();
       
        vo.setStudent_name(sform.getStudent_name());
       
        vo.setRollno(sform.getRollno());
       
        stubl bl=new stubl();
       
        String msg=bl.insert(vo);
       
        if(msg.equals("success"))
        {
            return mapping.findForward("success");
        }
        else
            return mapping.findForward("failure");
    
    }
}


Step_11:

            Configure Struts-config.xml

Step_12:

            Create jsp files.

Home.jsp

< %@ taglib uri="/WEB-INF/struts-bean.tld" prefix="bean" % >
< @ taglib uri="/WEB-INF/struts-html.tld" prefix="html" % >
< @ taglib uri="/WEB-INF/struts-logic.tld" prefix="logic" % >
< html >
< head >

< title > JSP Page < /title >
< /head >
< body >
< html:form action="/student" >
Student_name: < html:text property="student_name"/ >
< br >
RollNo: < html:text property="rollno"/ >
< br >
< html:submit value="OK"/ >
< /html:form >
< /body >
< /html >


success.jsp


< html >
< head >

< title > JSP Page < /title >
< /head >
< body >
Success
< /body >
< /html >

Step_13:

Right click on NStudent Project and select properties.

Project Properties-NStudent window will open.

Under categories

Select Libraries

In the Right side

Click Add JAR/Folder

And select mysql-connector (You shoud know where you stored mysql-connector)

You  can Download mysql-conector from mysql-connector

And click OK.


Step_14:

Run Home.jsp


Conclusion:

From this Post we have understood how to use jdbc and how to insert date into the table .

You have any query

Post comments.

Struts Application-dynaActionForm

Struts Application-Actionform-DynaActionForm.

Purpose:
             No need to create actionform explicitly.

            We made some change in Struts-config.xml file
             under WEB-INF


Procedure:

Step_1:

Add Properties into Struts-config.xml file.

< form-beans >

< form-bean name="loginform" type="org.apache.struts.action.DynaActionForm" / >
< form-property name="password" type="java.lang.String" / >
< form-property name="username" type="java.lang.String" / >
< /form-bean >

< /form-beans >


Step_2:

Create action class.

Include code below

public ActionForward execute(ActionMapping mapping, ActionForm form,
HttpServletRequest request, HttpServletResponse response)
throws Exception
{

DynaActionForm sform=(DynaActionForm)form;

if((sform.get("username")).equals("suresh"))
{
return mapping.findForward("one");
}
else
{
return mapping.findForward("two");
}

}


Step_3:

          Configure Struts.config.xml


Step_4:

Creating dyna.jsp

<%@ taglib uri="/WEB-INF/struts-bean.tld" prefix="bean" %>
<%@ taglib uri="/WEB-INF/struts-html.tld" prefix="html" %>
<%@ taglib uri="/WEB-INF/struts-logic.tld" prefix="logic" %>
< html/ >
< head > < title > JSP Page < /title > < /head >
< body >
< html:form action="/dyna" >
< html:text property="username"/ >
< html:password property="password" / >
< html:submit/ >
< /html:form >
< /body
< /html >


Step_5:

Creating one.jsp and two.jsp

One.jsp

< html >
< head > < title > One jsp < /title > > / head <
< body >
Welcome One .jsp
< / body >
< / html >

two.jsp

< html >
< head > < title > One jsp < /title > > / head <
< body >
Welcome One .jsp
< / body >
< / html >


Step_6:

          Run the dyna.jsp


You give username as suresh , the one.jsp file will be executed, otherwise the two.jsp file will be executed.

you give sureshs as username You get


Conclusion:

We have seen dynaActionForm class. if It is not necessary to create

actionform explicitly. when we use dynaActionForm.

Friday, May 7, 2010

Struts Application- LookUpDispatchAction

Struts Application- LookUpDispatchAction


Purpose:

Org.apache.struts.actions.LookUpDispatchAction is a built in action in struts framework.
This class enables a user to perform different task using a single action class. It eliminate for creating multiple action class for each task.

DispatchAction and LookupDispatchAction are same But LookupDispatchAction uses java Map interface and ApplicationResources.properties to dispatch method.


Procedure:

Step_1:

Creating action class.

                             When you create action class you select configuration file into

                              org.apache.struts.actions.LookupDispatchAction


package actions;

import javax.servlet.http.HttpServletRequest;
import javax.servlet.http.HttpServletResponse;

import org.apache.struts.actions.LookupDispatchAction;
import org.apache.struts.action.ActionForm;
import org.apache.struts.action.ActionMapping;
import org.apache.struts.action.ActionForward;
import java.util.*;

public class lookAction extends LookupDispatchAction
{


protected Map getKeyMethodMap()
{
Map map = new HashMap();
map.put("suresh.one", "one");
map.put("suresh.two", "two");
map.put("suresh.three", "three");
return map;
}

public ActionForward one(ActionMapping mapping,
ActionForm form,
HttpServletRequest request,
HttpServletResponse response) throws java.lang.Exception
{

return mapping.findForward("one");
}


public ActionForward two(ActionMapping mapping,
ActionForm form,
HttpServletRequest request,
HttpServletResponse response)
{

return mapping.findForward("two");
}


public ActionForward three(ActionMapping mapping,
ActionForm form,
HttpServletRequest request,
HttpServletResponse response) throws java.lang.Exception
{

return mapping.findForward("three");
}


}


Step_2:

Creating actionform class.

You create action form class . where you insert setter and getter method for method;

Private String method;


package actionforms;

import javax.servlet.http.HttpServletRequest;
import org.apache.struts.action.ActionErrors;
import org.apache.struts.action.ActionMapping;
import org.apache.struts.action.ActionMessage;


public class lookForm extends org.apache.struts.action.ActionForm
{

private String method;

public String getMethod() {
return method;
}

public void setMethod(String method) {
this.method = method;
}
}

Step_3:

Made some change in ApplicationResources.properties.

Add below code.

suresh.one=one
suresh.two=two
suresh.three=three

Step_4:

Made change in Struts-congif.xml

< action-mappings >
< action
input="/"
name="lookForm"
path="/look"
scope="session"
validate="false"
parameter="method"
type="actions.lookAction" >
< forward name="one" path="/jsp/one.jsp"/ >
< forward name="two" path="/jsp/two.jsp"/ >
< forward name="three" path="/jsp/three.jsp"/ >
< /action>

< /action-mappings >


Step_5:

Creating jsp file for look.jsp


< %@ taglib uri="/WEB-INF/struts-bean.tld" prefix="bean" % >
< %@ taglib uri="/WEB-INF/struts-html.tld" prefix="html" % >
< %@ taglib uri="/WEB-INF/struts-logic.tld" prefix="logic" % >

< html >

< head > < title > JSP Page < /title>
< /head >
< body >
< html:form action="/look.do?method=one" >
< html:submit value="one"/ >
< /html:form >
< html:form action="/look.do?method=two" >
< html:submit value="two"/ >
< /html:form >
< html:form action="/look.do?method=three" >

< html:submit value="three"/ >

< /html:form >

< /body >

< /html >


Step_6:

Create one.jsp and two.jsp and three.jsp.


Step_7:

Run look.jsp

Right click on look.jsp and run the file. Or Shift+f6.


Note: You have any doubt. Give comments. You give your email address in comments. I shall workspace for the struts project to your email address.

Struts Application-Action-Dispatch Action


Struts Application-Action-Dispatch Action
AIM:

            Dispatch Action is a built in action.

Dispatch Action enables us to perform the related several action in single action class.

Example:

We have several buttons and that button will perform separate function or task.

We have a jsp page that page many button or many links such as one and two and three. If we select one, the one.jsp page will open. If we select two, the two.jsp page will open. If we select three, the three.jsp page will open.

Problem:

Dispatch.jsp page have three link. One is one  and second is second and three is  three.

Algorithm:
                    Step_1:
                             Creating actionforms.

                    Step_2:
                             Creating actions

                    Step_3:
                             Configure Struts-config.xml

                    Step_4:
                             Creating jsp file

Procedure:

 Step_1:
                             Creating actionform(I have used actionforms name is disForm)
                            
                             Right Click on actionforms folder.

                             New Other. The New File window will open.

                 NOTE:

                          Do You forget how to create actionform?. Please see Struts    

                         Application First Struts Application.


Under categories

                   Select Struts

Under file types

                   Select Struts ActionForm Bean                              

Next.

                   New Struts ActionForm Bean windowl will open. Where you give class name (I have used actionform as disForm)

Finish.

Now the disForm class Successfully created.

We include

          Private String method;

         And generate setter and getter for method;

        Note: I already have said how to create setter and getter .

Step_2:


           Note: Do You want how to create action class with picture.  Please see Struts     

          Applicaton-First Struts Application.

          Creating action class ( I have used action class as disAction)

Right click on actions folder.

New and Other.


The New File window will open.

 Where you select Struts and Struts action class.

where you give action class name and change configuration file to  
org.apache.struts.actions.DispatchAction.


Next and Finish.

Now disAction class created successfully.

After Removing coding that occur between comment line.

You get like below.


package actions;

import javax.servlet.http.HttpServletRequest;
import javax.servlet.http.HttpServletResponse;
import org.apache.struts.actions.DispatchAction;
import org.apache.struts.action.ActionForm;
import org.apache.struts.action.ActionMapping;
import org.apache.struts.action.ActionForward;

public class disAction extends DispatchAction
{

    public ActionForward myAction1(ActionMapping mapping, ActionForm  form,
            HttpServletRequest request, HttpServletResponse response)
            throws Exception
    {
       
        return mapping.findForward(SUCCESS);
    }
   
    public ActionForward myAction2(ActionMapping mapping, ActionForm  form,
            HttpServletRequest request, HttpServletResponse response)
            throws Exception
    {
       
        return mapping.findForward(SUCCESS);
    }
}

In this coding you made change for your desire. I made change  in myAction1 to one and myAction2 to two. And include code for three.

Step_3:

          Configure Struts-config.xml

          Open Struts-config.xml
          where you give parameter attribute as method this method is created in action   


          form.


Step_4:


Create Home.jsp file


< %@ taglib uri="/WEB-INF/struts-bean.tld" prefix="bean" % >


< %@ taglib uri="/WEB-INF/struts-html.tld" prefix="html" % >


< %@ taglib uri="/WEB-INF/struts-logic.tld" prefix="logic" % >


< html >


< head > < title > JSP Page < /title >


< /head >


< body >


< html:form action="/look.do?method=one" >


< html:submit value="one"/ >


< /html:form >


< html:form action="/look.do?method=two" >


< html:submit value="two"/ >


< /html:form >


< html:form action="/look.do?method=three" >


< html:submit value="three"/ >


< /html:form >


< /body >


< /html >


Step_5:


Create one.jsp and two.jsp and three.jsp


Step_6:


Run the Home.jsp


Right click on Home.jsp and Run file or Shift+f6


Conclusion:


From this post you have learned dispatch action and forward action. This actions are build in actions in struts framework.