Struts 2 – Validation-Double Validation
Aim:
The Double validator of Struts 2 Framework checks if the given input is double or not. If the input is not double, it generates the error message. Double validator can be used to check the input range.
Step 1:
Create Project(named DoubleValidatePro)
File—New Project

New Project window will open like below.

Where you select Java web under Categories and also select Web Application under Projects.
Next
New Web Application will open.
Where you give project name (DoubleValidatePro)

Next
New web Application window will open.


Where you select Server as Apache tomcat 6.0.20 and Java EE Version into Java EE 5.
Next
New Web Application window will open.

Where you select Struts2

You remove example under Web Pages and example under Source Packages and example.xml under
Step 2:
Create Folder validate under web pages and also create Folder validate under Source Packages
Step 2.1:
Right Click on Web Pages and New and Folder.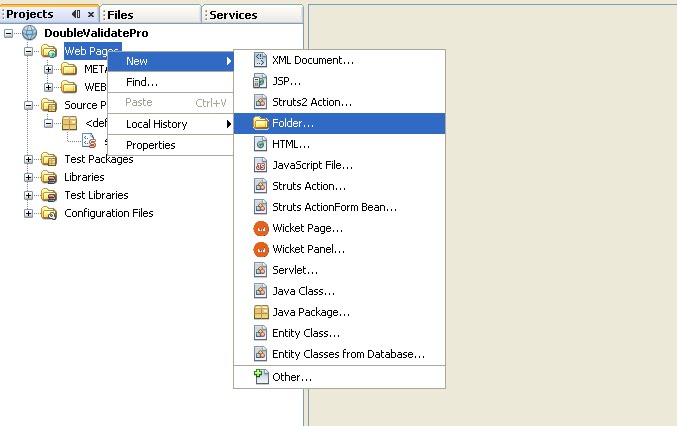
Where you give Folder name as validatedouble.
Step 2.2:
Right Click on Source Packages and New – Folder.
New Folder window will open. Where you give Folder name as validatedouble.
Step 3:
Create jsp file
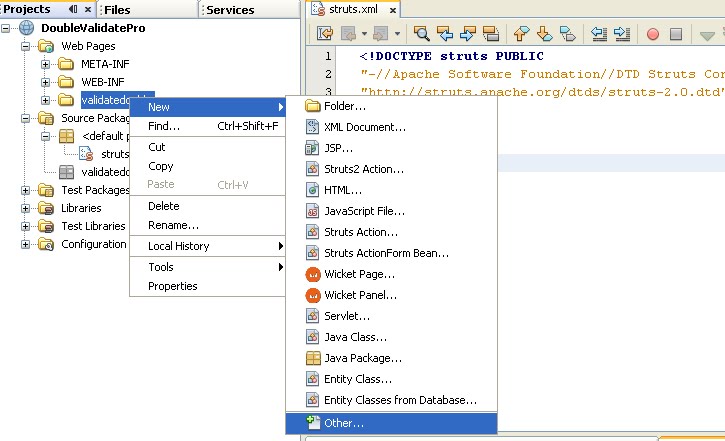
Right click on validatedouble and New – other – New File window will open. Where you select web under categories and select JSP under file type.
Next


home.jsp file have created.
Insert following code into home.jsp
< %@taglib uri="/struts-tags" prefix="s" % >
< html >
< head > < title > Home < /title > < /head >
< body >
< s:form action="doublevalidate" method="post" >
< s:textfield label="Applicant Hight" name="height"/ >
< s:submit >
< /s:form >
< /body >
< /html >
Step 4:
Create Action (give action name as doublevalide)
Right click on validatedouble under Source Packages.
New – Other – under categories – Struts2 / under file type Struts2 Action
Next
New Struts2 Action window will open.
Where you give action name as doublevalide.
Finish.
Include following coding into doublevalide
package validatedouble;
import com.opensymphony.xwork2.ActionSupport;
public class doublevalide extends ActionSupport
{
private double height;
public double getHeight()
{
return height;
}
public void setHeight(double height)
{
this.height = height;
}
public doublevalide()
{
}
public String execute() throws Exception
{
if(getHeight()>155.5)
{
return "success";
}
else
{
return "error";
}
}
}
Step 5:
Create xml file for validation.
Format
< Action class name > -validation.xml
doublevalide-validation.xml
include following coding into doublevalide-validation.xml
< ?xml version="1.0" encoding="UTF-8"? >
< !DOCTYPE validators PUBLIC
"-//OpenSymphony Group//XWork Validator 1.0.2//EN"
http://www.opensymphony.com/xwork/xwork-validator-1.0.2.dtd >
< validators >
< field name="height" >
< field-validator type="double" >
< param name="minInclusive" > 155.5 < /param >
< param name="maxInclusive" > 165.5 < /param >
< message > Height need to between
${minInclusive} and ${maxInclusive} < /message >
< /field-validator >
< /field >
< /validators >
Step 6:
Create success.jsp file
< html >
< head > < title > Success < /title > < /head >
< body >
You Are valid candidate
< body >
< html >
Step 7:
Run the home.jsp


